- はじめに -
近年、VRのブームのおかげもあってモーションキャプチャー分野も発展しつつあります。
本記事は、お手軽モーションキャプチャー端末であるLeap MotionをPython 3.xから利用し、様々な家電やPC上の操作をジェスチャーで行おうという記事です。
都内某企業でLTする機会があったのでネタにしたところダダ滑りしたのでこの記事もボツにしようとしましたが、現状多分多くの人が詰まるので、正しくPython3系でLeap Motionが使えるように公開しておきます。

【国内正規代理店品】 Leap Motion 小型モーションコントローラー 3Dモーション キャプチャー システム
- 出版社/メーカー: Leap Motion
- メディア: エレクトロニクス
- この商品を含むブログ (3件) を見る
- Leap Motionとは -
前述したように、人体の動きをデータ化するモーションキャプチャー分野は、近年急速に発展しています。
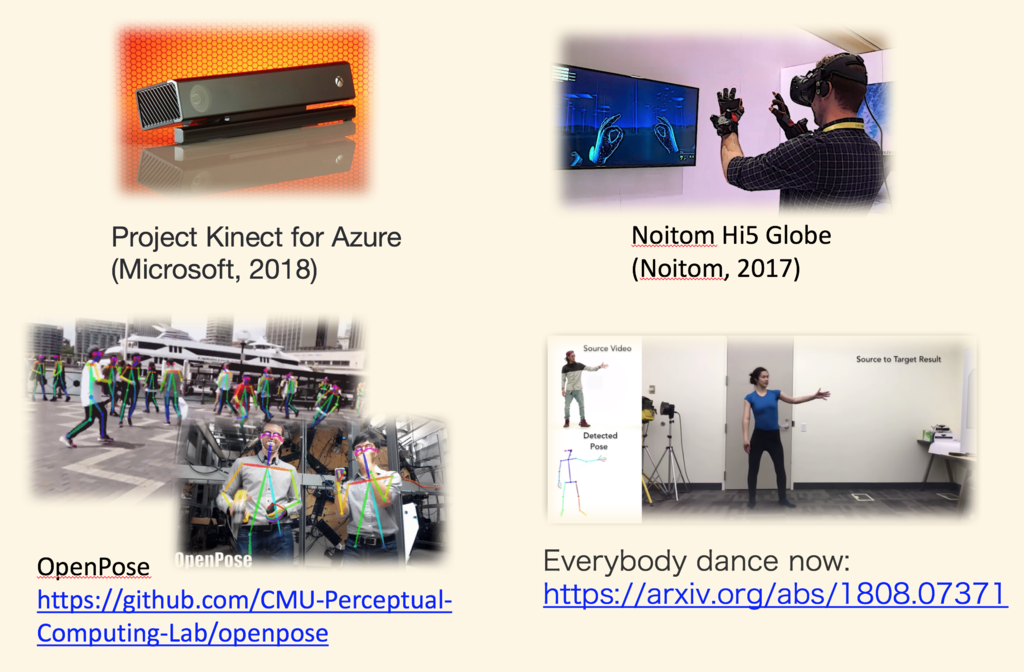
キャプチャー端末分野では先日のbuild2018にてProject Kinect for Azure (Microsoft,2018)が発表されたりだとか、ハンドキャプチャー特化で見てもグローブを装着して高精度に手の動きを認識するNoitom Hi5 (Noitom, 2017)が話題になったりだとか、画像認識分野ではOpenPose(CMU Perceptual, 2017)が出たりとか、あらゆる方面から進展しています。

Leap Motionは、2012年よりLeap Motion社が発売しているハンドモーションキャプチャーデバイスです。
光センサ、赤外線センサを搭載していて、なかなかの精度で手の骨格の動きを取得する事ができます。
Windows, Mac, Linuxに対応したドライバが存在するだけでなく、Unity, Unreal Engineへの対応、以下の言語に対応するSDKとライブラリが公開されています。
(ただこれはSDK v3の話で、v4ではc++, java, pythonがメインになっています)
価格はAmazon最安で9,900円。

【国内正規代理店品】 Leap Motion 小型モーションコントローラー 3Dモーション キャプチャー システム
- 出版社/メーカー: Leap Motion
- メディア: エレクトロニクス
- この商品を含むブログ (3件) を見る
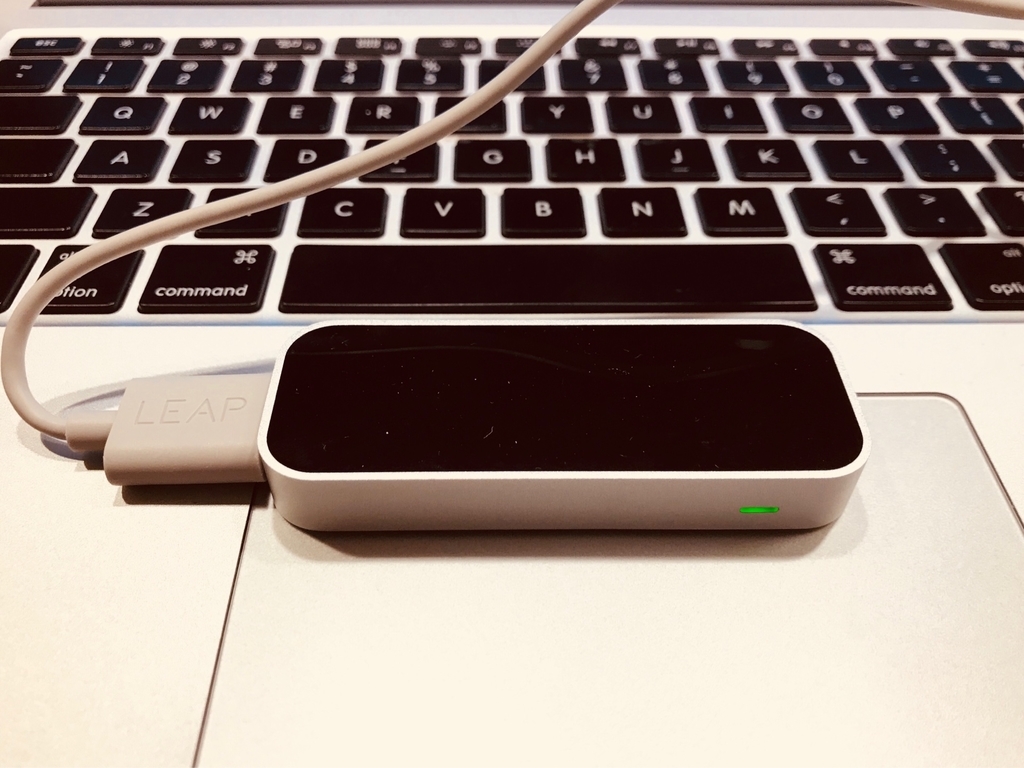
サイズとしてはこれくらいで扱いやすいです。USBケーブルが専用かつ1mしかないのがちょっとだけネックです。
Leap MotionはHPよりLeap Motion搭載のPCが発売されたり、公式WebStoreではOculus RiftやHTC Viveに装着できる機器が出ています。デベロッパーギャラリーもあり、世界の開発者が作成したアプリで遊んだり、自身の作ったものを公開できる環境も存在します。

手軽にモーションキャプチャーの世界に入り込める、最初に遊ぶに最適な製品です。
- Leap Motionで取得できる情報 -
Leap Motionでは、両手における、手のひら中央及び各指、各関節のstart_point, end_pointにおける空間座標(3次元)と方向ベクトル(3次元)が取得できます。

また、SDKの提供するAPIでは以下のGestureが定義されています。
- circle: 指で円を描く動作
- swipe: 手を左右に動かす動作
- key tap: 指で物を選択するような動作
- screen taps: スクリーンをTapする動作

- Leap Motionに関連する開発 -
Leap Motion周りの開発について調べると、古いバージョンのSDK v3を利用した情報が多く存在します。例えばPythonであれば以下等
PythonでLeapMotionのデータを取得する。 - Qiita
PythonでLeapMotionを使ってみる - Qiita
Leap Motion を Pythonから使う方法を調べた | Futurismo
LeapMotionとpythonで遊ぶ
また、公式HPから参照できる以下のページでは、SDK v3までのReferenceしか参照することができません。
Leap Motion SDK Reference : Python SDK Documentation — Leap Motion Python SDK v3.2 Beta documentation
これは、以下のような内容からきています。
- SDK v4からLeapCxxという名前でGithub上でライブラリが管理されるようになった
- それまでのLeapAPIは非推奨となりLeapCなるAPIが提供されはじめた(LeapCxxの一部)
- v4は未だbeta版であり、Mac、Linuxはv2の利用を推奨されている
LeapCxxではswigで多言語対応される事を前提として高速化され、LeapCSharpやUnityModulesなどのBindingを切り離す事にも成功しています。
まとめると「Windowsで利用可能な言語であればLeapCxxを使ったほうが良いが、現状使えない場面の方が多い」という事になります。
LeapCxx : GitHub - leapmotion/LeapCxx: Implementation of older C++ API using LeapC
LeapCxx documentation : Leap Motion C API: Leap Concepts
Windowsならv4版、Windowsじゃ無くてもv3版使えば良いじゃんとなる訳ですが、私はWindowsが扱えないのと、v3以前の開発環境は以下のようになっています。
行列や機械学習に突っ込む事も考慮して、せめてMacbookのPython3で動くようにしていきます。
(本記事では、Mac, Python3での利用を想定しますが、今後Windowsでv4を利用した記事もがんばって公開する予定です。)
Leap Motion Controllerのインストール
以下からControllerをダウンロードします。
www.leapmotion.com
ダウンロードしたdmgファイルを使ってインストールすると、MacであればメニューにLeap Motionアイコンが追加されます。
Visualizerが付属していますので遊んでみます。
Leap Motion SDK v2のインストール
Leap Motion SDKのv2を以下よりダウンロードします。
こちらをswigを用いてPython3系でも利用できるように改修していきます。
V2 Tracking — Leap Motion Developer
zipを解凍すると、配下にdmgファイルがあるはずなので、そちらを利用してSDKをインストールします。
また、解凍したファイル群の中には「./LeapSDK/samples/Sample.py」なるサンプルが存在します。
以降このサンプルを利用してもよいですが、このSample.pyはpython 2.xベースですので今回は使いません。
python 3系への対応
公式がswigでPython3系に対応する方法を公開してくれています。
support.leapmotion.com
雑に調べた所、以下2つのリポジトリがpython3に対応してそうに見えますが、中身は上記の記事をスクリプトに落とし込んだだけのようですので、自身で作業した方が良さげです。
GitHub - Nagasaki45/leap_python3: Build LeapMotion binaries for python3
GitHub - BlackLight/leap-sdk-python3: Leap Motion SDK - Python 3 module builder
先程解凍したLeap Motion SDK の配下に入り ./LeapSDK/ に移動して雑なディレクトリを作ります。
cd LeapSDK
mkdir work
ls
> docs/         head_sha.txt  include/      lib/          samples/      util/         version.txt   work/
必要なファイルを全てworkにコピーしてswigに投げます
cp include/Leap.i work
cp include/LeapMath.h work
cp include/Leap.h work
cp lib/libLeap.dylib work

cd work
swig -c++ -python -o LeapPython.cpp -interface LeapPython Leap.i
この時、以下のようなエラーが出るはずです。
Leap.i:991: Error: Line indented less than expected (line 3 of %pythoncode or %insert("python") block) as no line should be indented less than the indentation in line 1
Leap.i:1009: Error: Line indented less than expected (line 16 of %pythoncode or %insert("python") block) as no line should be indented less than the indentation in line 1
Leap.i:542: Error: Line indented less than expected (line 13 of %pythoncode or %insert("python") block) as no line should be indented less than the indentation in line 1
Leap.i:552: Error: Line indented less than expected (line 7 of %pythoncode or %insert("python") block) as no line should be indented less than the indentation in line 1
Leap.i:1115: Error: Line indented less than expected (line 6 of %pythoncode or %insert("python") block) as no line should be indented less than the indentation in line 1
Leap.i:1116: Error: Line indented less than expected (line 6 of %pythoncode or %insert("python") block) as no line should be indented less than the indentation in line 1
Leap.i:1117: Error: Line indented less than expected (line 6 of %pythoncode or %insert("python") block) as no line should be indented less than the indentation in line 1
Leap.i:1121: Error: Line indented less than expected (line 6 of %pythoncode or %insert("python") block) as no line should be indented less than the indentation in line 1
Leap.i:1118: Error: Line indented less than expected (line 6 of %pythoncode or %insert("python") block) as no line should be indented less than the indentation in line 1
Leap.i:1122: Error: Line indented less than expected (line 6 of %pythoncode or %insert("python") block) as no line should be indented less than the indentation in line 1
Leap.i:1123: Error: Line indented less than expected (line 6 of %pythoncode or %insert("python") block) as no line should be indented less than the indentation in line 1
Leap.i:1119: Error: Line indented less than expected (line 6 of %pythoncode or %insert("python") block) as no line should be indented less than the indentation in line 1
Leap.i:1120: Error: Line indented less than expected (line 6 of %pythoncode or %insert("python") block) as no line should be indented less than the indentation in line 1
Leap.i:565: Error: Line indented less than expected (line 10 of %pythoncode or %insert("python") block) as no line should be indented less than the indentation in line 1
Leap.i:1156: Error: Line indented less than expected (line 23 of %pythoncode or %insert("python") block) as no line should be indented less than the indentation in line 1試しにLeap.iの991行目を見ると分かりますが、以下のようにpythonコードと言いつつdefの前にインデントが入ってます。
%extend Leap::Vector {
%pythoncode {
  def to_float_array(self): return [self.x, self.y, self.z]
  def to_tuple(self): return (self.x, self.y, self.z)
%}}
インデントが合うように、%pythoncodeで検索し、全ての行に存在する前空白2個を消していけば良いです。
1115行から1123行目のエラー原因も別箇所のpythoncodeにあります。私はvimで雑にやりました…
swigによって「LeapPython.cpp」なるファイルが生成出来ていれば成功です。
このファイルを利用しているPythonに紐付ける作業を行います。
clang++ -arch i386 -arch x86_64 -I/Library/Frameworks/Python.framework/Versions/3.6/include/python3.6m LeapPython.cpp libLeap.dylib /Library/Frameworks/Python.framework/Versions/3.6/lib/libpython3.6.dylib -shared -o LeapPython.so
pyenv等System以外のPythonを利用している場合は、python3.6mへのpathを、それぞれPythonの/include/pythonNNmディレクトリを指すようにします。
私は面倒なのでpyenv local systemでworkディレクトリではsystemのpython3.6を利用するようにしています。
LeapPython.soとLeap.pyが出力されていれば終わりです。
SampleはSwig解説記事の最後にある以下リンクからダウンロードしたものを使います。
https://leapmotion-assets-production.s3.amazonaws.com/Jsf1V_R5_kbRNHu3QKdenQ/LeapPython33.zip
解凍すると、SamplePython33.pyがあるのでそちらをworkディレクトリに移動します。(解凍したら3.3用のLeapPython.soが付いてくるけど基本無視で)
workの中でls
ls
> eap.h             Leap.i             Leap.py            LeapMath.h         LeapPython.cpp     LeapPython.h       LeapPython.so*     SamplePython33.py* libLeap.dylib*
そのままpython3.6でSamplePython33.pyを実行するとLeap.pyのimportエラーが出ます。
  File "/Users/vanquish/Documents/work/LeapDeveloperKit_2.3.1+31549_mac 2/LeapSDK/work/Leap.py", line 345
    %
    ^
SyntaxError: invalid syntax
Leap.pyを見てみると何箇所か%だけが記載されている行があるので、Leap.pyからその行を削除します。
これで多分動きます。
python3.6 SamplePython33

> Initialized
> Press Enter to quit...
> Connected
> Frame id: 46613, timestamp: 4268852938, hands: 0, fingers: 0, tools: 0
> Frame id: 46614, timestamp: 4268957238, hands: 0, fingers: 0, tools: 0
> Frame id: 46615, timestamp: 4269061570, hands: 0, fingers: 0, tools: 0
> Hand has 5 fingers with average tip position (38.1071, 111.769, -141.137)
> Palm position: (51.3712, 76.887, -72.069)
> Pitch: 31.787451 degrees,  Roll: 17.410023 degrees,  Yaw: -10.570597 degrees
> Hand curvature radius: 124.589699 mm
> Frame id: 49355, timestamp: 4485494804, hands: 1, fingers: 5, tools: 0
> Hand has 5 fingers with average tip position (37.3419, 113.345, -140.911)
> Palm position: (50.7582, 77.6839, -72.2254)
>  ...
後はSamplePython33.pyを見れば分かりそうですが、on_frame メソッドに手の情報が流れ込んでくるので、それに応じてGesture判定したり動作を書いてやれば良い感じです。
- 家電を動かす -
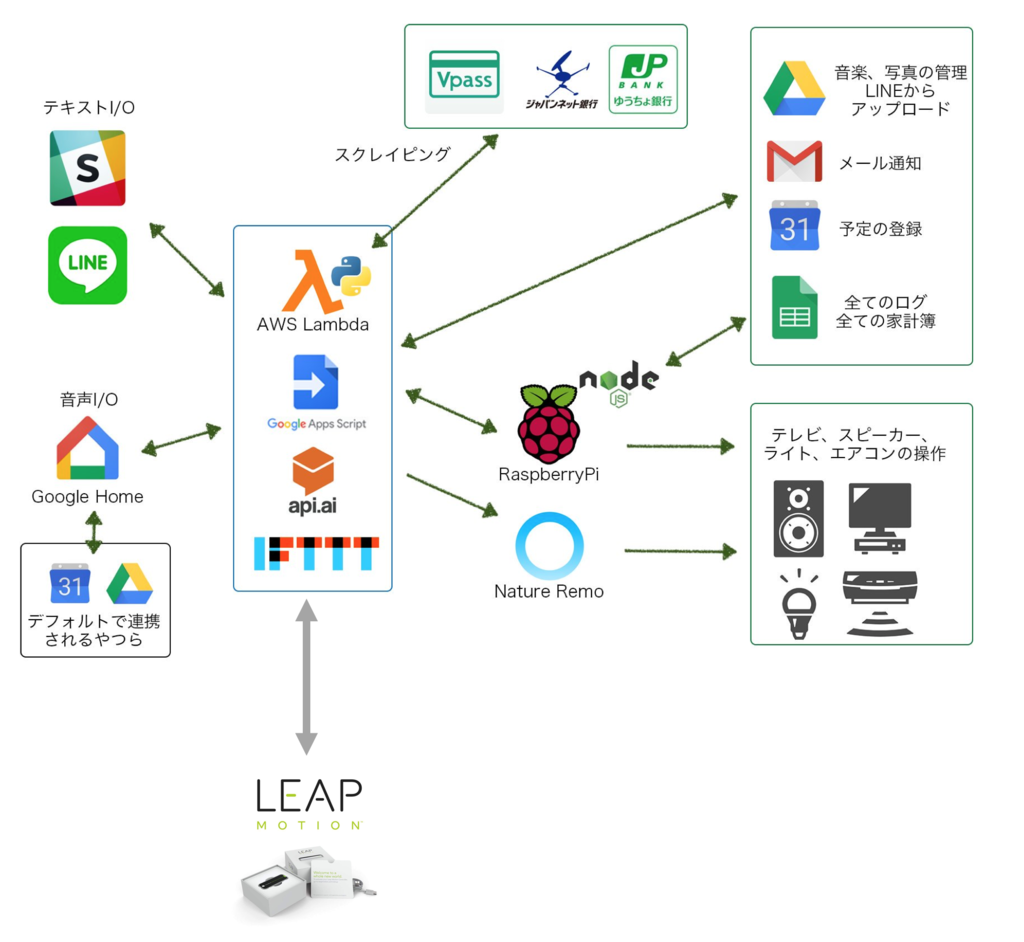
私の家のIoT環境です。ここにLeap Motionを足してみます。
実際にテレビの操作をしているGIFです。GIFに収めている関係上めっちゃ反応がよく見えます(実際は30秒くらいの動画です)。
電気やクーラー、テレビも「OK, Google全部消して」等で消せるようにしていますので、そちらのトリガーをLeap Motionにしてみます。
まあここまで書いてなんですが、実際他にも「ターミナルやTweetDeckを起動する」とか「じゃんけんアプリを作ってみる」とかやったものの、あんまりウケそうなものができずコレに落ち着きました…
実際やってみる中で、モーションキャプチャーで何するかと考えてもどれも微妙で「妻がキレてる時に声出してオーケーグーグルって言えない時」とかに使えるかも知れないなレベルの感想しか得られませんでした。
このクックパッドを手で操作するのは公開されているアプリで最初に試したんですが、唯一これが料理中とかに使い物になるかもしれないなあ…

- おわりに -
普通にデバイスとしては面白いですし、多分VR機器買ったらもっと遊べるんだと思います。
昔高専に居た頃にKinectを触った事がありますが、手の認識に関してはKinectよりは精度良く安く出来て暇つぶしに良い端末です。

【国内正規代理店品】 Leap Motion 小型モーションコントローラー 3Dモーション キャプチャー システム
- 出版社/メーカー: Leap Motion
- メディア: エレクトロニクス
- この商品を含むブログ (3件) を見る